


In this tutorial you'll learn how to build an API using FastAPI and MySQL. we'll be interacting with the database using mysqlclient, sqlalchemy, and alembic for migrations.
App Overview
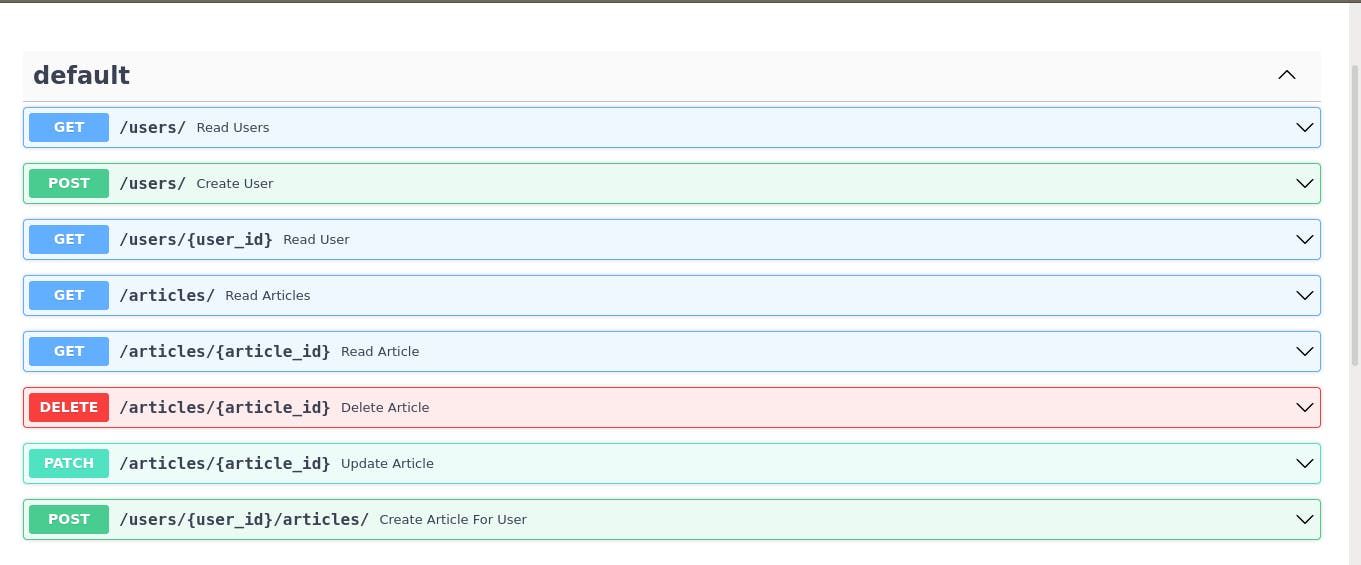 these are the endpoints we are going to be building in this app.
Project Setup
start by creating a folder for your project called "fastapi-blog"
$ mkdir fastapi-blog
$ cd fastapi-blog
next create and activate your virtual environment:
$ python3 -m venv env
$ source env/bin/activate
next setup the following directory structure:
fastapi-blog
    └── app
    │   ├── __init__.py
    │   ├── crud.py
    │   ├── database.py
    │   ├── main.py
    │   ├── models.py
    │   └── schemas.py
    ├── env
    ├──requirements.txt
    └──run.sh
run.sh is a bash script to run the application:
uvicorn app.main:app --reload
Add the following dependencies to your requirements.txt file:
alembic==1.7.7
fastapi==0.75.0
python-dotenv==0.20.0
mysqlclient==2.1.0
uvicorn==0.17.6
Install them:
(env)$ pip install -r requirements.txt
MySQL
in this section we'll setup MySQL which is an open source relational database management system, and configure our app to work with it.
Setup
To get started with MySQL follow the installation guide. Confirm your installation:
$ mysql --version
$ mysql  Ver 8.0.28-0ubuntu0.20.04.3 for Linux on x86_64 ((Ubuntu))
Login as root:
$sudo mysql
but if your root MySQL user is configured to authenticate with a password, you will need to use a different command to access the MySQL shell.
$ mysql -u root -p
Then create a new user:
mysql> CREATE USER 'xyz'@'localhost' IDENTIFIED BY 'password';
and grant your new user all necessary privileges
mysql> GRANT ALL PRIVILEGES ON *.* TO 'xyz'@'localhost' WITH GRANT OPTION;
Many guides suggest running the FLUSH PRIVILEGES command immediately after a CREATE USER or GRANT statement in order to reload the grant tables to ensure that the new privileges are put into effect:
mysql> FLUSH PRIVILEGES;
Create and select the database:
mysql> CREATE DATABASE fastapi_blog;
mysql> use fastapi_blog;
If you experience any issues consult this guide
mysqlclient Setup
add the dependency to your requirements file:
mysqlclient==2.1.0
Install:
(venv)$ pip install -r requirements.txt
SQLAlchemy
This is an object relational mapping library. it helps to map between objects in python code and database tables. With an ORM, you normally create a class that represents a table in a SQL database, each attribute of the class represents a column, with a name and a type.
Now create your SQLAlchemy database connection in the file app/database.py:
from sqlalchemy import create_engine
from sqlalchemy.ext.declarative import declarative_base
from sqlalchemy.orm import sessionmaker
from dotenv import load_dotenv
import os

load_dotenv()

SQLALCHEMY_DB_URL = os.getenv("DATABASE_URL")
engine = create_engine(SQLALCHEMY_DB_URL)
SessionLocal = sessionmaker(autocommit=False, autoflush=False, bind=engine)

Base = declarative_base()
In the code example above, we're connecting to the MySQL database created earlier.
The DATABASE_URL environmental variable should look like this:
mysql+mysqldb://<user>:<password>@localhost/<database_name>
switch out the values in the connection string with your database credentials.
Create Pydantic schemas for data validation
In schemas.py we define Pydantic schemas that will be used to validate data being passed to our API, and structure the data being returned from it.
import email
from typing import List, Optional
from datetime import datetime
from pydantic import BaseModel, EmailStr


class ArticleBase(BaseModel):
    title: str
    body: Optional[str] = None


class ArticleCreate(ArticleBase):
    pass


class Article(ArticleBase):
    id: int
    author: EmailStr
    created_at: datetime
    updated_at: Optional[datetime]

    class Config:
        orm_mode = True


class ArticleUpdate(BaseModel):
    title: Optional[str]
    body: Optional[str]

    class Config:
        orm_mode = True


class UserBase(BaseModel):
    email: EmailStr


class UserCreate(UserBase):
    password: str


class User(UserBase):
    id: int
    is_active: bool
    articles: List[Article] = []

    class Config:
        orm_mode = True
Pydantic's orm_mode configuration will tell Pydantic to read the data even if it is not a dict, but an ORM model (or any other arbitrary object with attributes).
Add the following dependency to your requirements file for pydantic's EmailStr:
email-validator==1.1.3
and install :
(venv)$ pip install -r requirements.txt
Create the database models
In the file app/models.py create your SQLAlchemy models from the Base class created earlier in app/database.py. SQLAlchemy models are classes and instances that help you interact with the database.
These are the SQLAlchemy models we'll be working with:
from datetime import datetime
from sqlalchemy import Boolean, Column, ForeignKey, Integer, String, DateTime
from sqlalchemy.orm import relationship

from .database import Base


class User(Base):
    __tablename__ = "users"

    id = Column(Integer, primary_key=True, index=True)
    email = Column(String(255), unique=True, index=True)
    hashed_password = Column(String(255))
    is_active = Column(Boolean, default=True)

    articles = relationship("Article", back_populates="author", cascade="all,delete")

    def __repr__(self):
        return f"{self.email}"


class Article(Base):
    __tablename__ = "articles"
    id = Column(Integer, primary_key=True, index=True)
    title = Column(String(50))
    body = Column(String(255))
    created_at = Column(DateTime(), default=datetime.now())
    updated_at = Column(DateTime(), onupdate=datetime.now())
    author_id = Column(Integer, ForeignKey("users.id", ondelete="CASCADE"))
    author = relationship("User", back_populates="articles")

    def __repr__(self):
        return f"{self.title}"
The __tablename__ attribute is used by SQLAlchemy to determine the name of the database tables for the models.
Each model class attribute represents a column (Field) in the corresponding database table.
We use column from SQLAlchemy as the default value, and pass the appropriate SQLAlchemy class type, e.g., Integer, String, Boolean that defines the type in the database as an argument.
Then using relationship() provided by sqlalchemy.orm set up a bidirectional one-to-many relationship between the two tables by placing a foreign key on the "Many"/Child table and connect the two using the relationship.backpopulates parameter.
And setup cascading behavior when the Parent object is deleted, cascade="all, delete". When a parent object is deleted, it is therefore de-associated with its related objects.
Database Migrations
Database schema migration refers to the management of incremental, reversible changes and version control to relational database schemas. A migration is carried out on a database whenever it is necessary to update or revert the database's schema to some newer or older version.
We are going to be using Alembic as our migration tool, it was made by the creator of SQLAlchemy.
It automates the successive application or reversal of an appropriate sequence of schema changes until it's brought to a desired state.
To get started add it to your requirements file:
alembic==1.7.7
Install it:
(env)$ pip install -r requirements.txt
Now create your migration environment by running the following command in your project root:
(env)$ alembic init migrations
Your directory structure should now look like this:
.
├── alembic.ini
├── app
│   ├── crud.py
│   ├── database.py
│   ├── __init__.py
│   ├── main.py
│   ├── models.py
│   └── schemas.py
├── env
├── migrations
│   ├── env.py
│   ├── README
│   ├── script.py.mako
│   └── versions
├── README.md
├── requirements.txt
└── run.sh
Modify the env.py file
add the following imports to the file
import os
from app.models import Base
Configure your target_metadata, this allow you to auto-generate migrations:
target_metadata = Base.metadata
and setup your SQLAlchemy url:
config.set_main_option("sqlalchemy.url", os.getenv("DATABASE_URL"))
Creating migrations
With our enviroment in place we can now create a new revision with the following command:
(env)$ alembic revision --autogenerate -m "Adding User and Article Table"
Make sure you review all auto-generated migrations scripts before running them.
The file will be in the migrations/versions folder and it should look like this:
"""Add User and Article tables

Revision ID: b2e5c404276c
Revises:
Create Date: 2022-04-05 22:12:42.221212

"""
from alembic import op
import sqlalchemy as sa


# revision identifiers, used by Alembic.
revision = 'b2e5c404276c'
down_revision = None
branch_labels = None
depends_on = None


def upgrade():
    # ### commands auto generated by Alembic - please adjust! ###
    op.create_table('users',
    sa.Column('id', sa.Integer(), nullable=False),
    sa.Column('email', sa.String(length=255), nullable=True),
    sa.Column('hashed_password', sa.String(length=255), nullable=True),
    sa.Column('is_active', sa.Boolean(), nullable=True),
    sa.PrimaryKeyConstraint('id')
    )
    op.create_index(op.f('ix_users_email'), 'users', ['email'], unique=True)
    op.create_index(op.f('ix_users_id'), 'users', ['id'], unique=False)
    op.create_table('articles',
    sa.Column('id', sa.Integer(), nullable=False),
    sa.Column('title', sa.String(length=50), nullable=True),
    sa.Column('body', sa.String(length=255), nullable=True),
    sa.Column('created_at', sa.DateTime(), nullable=True),
    sa.Column('updated_at', sa.DateTime(), nullable=True),
    sa.Column('author_id', sa.Integer(), nullable=True),
    sa.ForeignKeyConstraint(['author_id'], ['users.id'], ondelete='CASCADE'),
    sa.PrimaryKeyConstraint('id')
    )
    op.create_index(op.f('ix_articles_id'), 'articles', ['id'], unique=False)
    # ### end Alembic commands ###


def downgrade():
    # ### commands auto generated by Alembic - please adjust! ###
    op.drop_index(op.f('ix_articles_id'), table_name='articles')
    op.drop_table('articles')
    op.drop_index(op.f('ix_users_id'), table_name='users')
    op.drop_index(op.f('ix_users_email'), table_name='users')
    op.drop_table('users')
    # ### end Alembic commands ###
To run the migration use the following command
(env)$ alembic upgrade head
Database CRUD Utility functions
In the app/crud.py file we have functions to interact with the database. With CRUD representing Create, Read, Update, and Delete. functionality.
from sqlalchemy.orm import Session
from sqlalchemy import update
from fastapi import HTTPException
import hashlib
from . import models, schemas

hash = hashlib.sha256()


def get_user(db: Session, user_id: int):
    return db.query(models.User).get(user_id)


def get_user_by_email(db: Session, email: str):
    return db.query(models.User).filter(models.User.email == email).first()


def get_users(db: Session, skip: int = 0, limit: int = 100):
    return db.query(models.User).offset(skip).limit(limit).all()


def create_user(db: Session, user: schemas.UserCreate):
    hash.update(user.password.encode("utf-8"))
    hashed_password = hash.hexdigest()

    db_user = models.User(email=user.email, hashed_password=hashed_password)
    db.add(db_user)
    db.commit()
    db.refresh(db_user)
    return db_user


def get_articles(db: Session, skip: int = 0, limit: int = 100):
    return db.query(models.Article).offset(skip).limit(limit).all()


def create_article(db: Session, article: schemas.ArticleCreate, user_id: int):
    db_item = models.Article(**article.dict(), author_id=user_id)
    db.add(db_item)
    db.commit()
    db.refresh(db_item)
    return db_item


def get_object_or_404(db: Session, Model: models.Base, object_id: int):
    db_object = db.query(Model).filter(Model.id == object_id).first()
    if db_object is None:
        raise HTTPException(status_code=404, detail="Not found")
    return db_object


def update_article(db: Session, article_id: int, updated_fields: schemas.ArticleUpdate):
    db.execute(
        update(models.Article)
        .where(models.Article.id == article_id)
        .values(updated_fields.dict(exclude_unset=True))
    )

    db.flush()
    db.commit()
    return updated_fields


def delete_article(db: Session, article: schemas.Article):
    db.delete(article)
    db.commit()
In the code above, we imported all necessary dependencies and defined the appropriate CRUD operations for both SQLAlchemy models using the ORM.
When updating an article instead of passing each of the keyword arguments to Item and reading each one of them from the Pydantic model, we are generating a dict with the Pydantic model's data with: item.dict(). And we specify exclude_unset=True so the fields that aren't specified during the partial update are not modified instead being saved as None in the database.
Main FastAPI Application
from typing import List

from fastapi import Depends, FastAPI, HTTPException, status
from sqlalchemy.orm import Session

from . import crud, models, schemas
from .database import SessionLocal, engine


app = FastAPI()


# Dependency
def get_db():
    db = SessionLocal()
    try:
        yield db
    finally:
        db.close()


@app.post("/users/", response_model=schemas.User)
def create_user(user: schemas.UserCreate, db: Session = Depends(get_db)):
    db_user = crud.get_user_by_email(db, email=user.email)
    if db_user:
        raise HTTPException(status_code=400, detail="Email already registered")
    return crud.create_user(db=db, user=user)


@app.get("/users/", response_model=List[schemas.User])
def read_users(skip: int = 0, limit: int = 100, db: Session = Depends(get_db)):
    users = crud.get_users(db, skip=skip, limit=limit)
    return users


@app.get("/users/{user_id}", response_model=schemas.User)
def read_user(user_id: int, db: Session = Depends(get_db)):
    db_user = crud.get_user(db, user_id=user_id)
    if db_user is None:
        raise HTTPException(status_code=404, detail="User not found")
    return db_user


@app.get("/articles/", response_model=List[schemas.Article])
def read_articles(skip: int = 0, limit: int = 100, db: Session = Depends(get_db)):
    articles = crud.get_articles(db, skip=skip, limit=limit)
    return articles


@app.get("/articles/{article_id}", response_model=schemas.Article)
def read_article(article_id: int, db: Session = Depends(get_db)):
    return crud.get_object_or_404(db, models.Article, object_id=article_id)


@app.post(
    "/users/{user_id}/articles/",
    response_model=schemas.Article,
    status_code=status.HTTP_201_CREATED,
)
def create_user_article(
    user_id: int, article: schemas.ArticleCreate, db: Session = Depends(get_db)
):
    db_user = crud.get_user(db, user_id=user_id)
    if db_user is None:
        raise HTTPException(status_code=404, detail="User does not exist")
    return crud.create_article(db=db, article=article, user_id=user_id)


@app.delete("/articles/{article_id}", status_code=status.HTTP_204_NO_CONTENT)
def delete_article(article_id: int, db: Session = Depends(get_db)):
    article = crud.get_object_or_404(db, models.Article, article_id)
    return crud.delete_article(db=db,article=article)


@app.patch("/articles/{article_id}", response_model=schemas.ArticleUpdate)
def update_article(
    article_id: int,
    updated_fields: schemas.ArticleUpdate,
    db: Session = Depends(get_db),
):
    return crud.update_article(db, article_id, updated_fields)
We start by using the SessionLocal class we created in the app/databases.py file to create a dependency. We need to have an independent database session/connection per request, and use the same session throughout the request and then close it when the request is finished. Our dependency will create a new SQLAlchemy SessionLocal that will be used in a single request, and then close it once the request is finished. We created the database session with yield in a try block in , and closed it afterwards in the finally block.
And then create the path operations and their handler functions and create the dependency in the path operation function. The create and update paths expect payloads that match the format of the ArticleCreate and ArticleUpdate schemas respectively. To test out our app start the server:
(env)$ bash run.sh
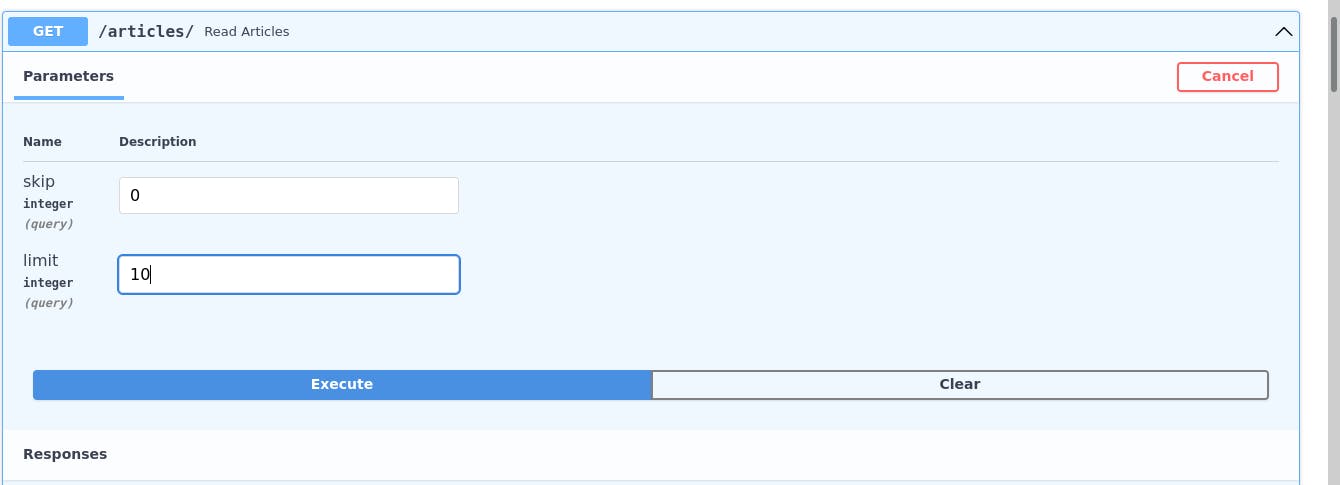
You can interact then with the API endpoints using the interactive API docs at localhost:8000/docs:
or by using the following curl commands:
Create a new user:
curl -d '{"email":"Spongebob@opensea.com", "password":"pass123"}' -H "Content-Type: application/json" -X POST http://localhost:8000/users/
List all users:
curl -v http://localhost:8000/users/
Create a new article with the associated user id:
curl -d '{"title":"Band geeks"}' -H "Content-Type: application/json" -X POST http://localhost:8000/users/1/articles/
Update the body of the new article:
curl -d '{"body":"Great performance"}' -H "Content-Type: application/json" -X PATCH http://localhost:8000/articles/1
Read the Article:
curl -v http://localhost:8000/articles/1
Delete the Article:
curl -X DELETE http://localhost:8000/articles/1
Conclusion
In this tutorial we learned to create an app with FastAPI and MySQL, using SQLAlchemy and alembic.
All the code can be found in this GitHub repository
Thanks for reading.