

Photo by Isaac Smith on Unsplash
Building a GraphQL API With Django
A Guide to Using GraphQL in Python and Incorporating External Data in an Application


Introduction
In this article, we are going to create a GraphQL API with Python. GraphQL is an alternative to the REST-based architecture and aims to solve its shortcomings. Unlike REST, GraphQL allows for requesting specific data that a client needs, departing from the fixed data structure approach.
We are going to use Graphene, a code-first library to build the API. Graphene allows you to write Python code to describe the data provided by your server, instead of writing GraphQL Schema Definition Language (SDL).
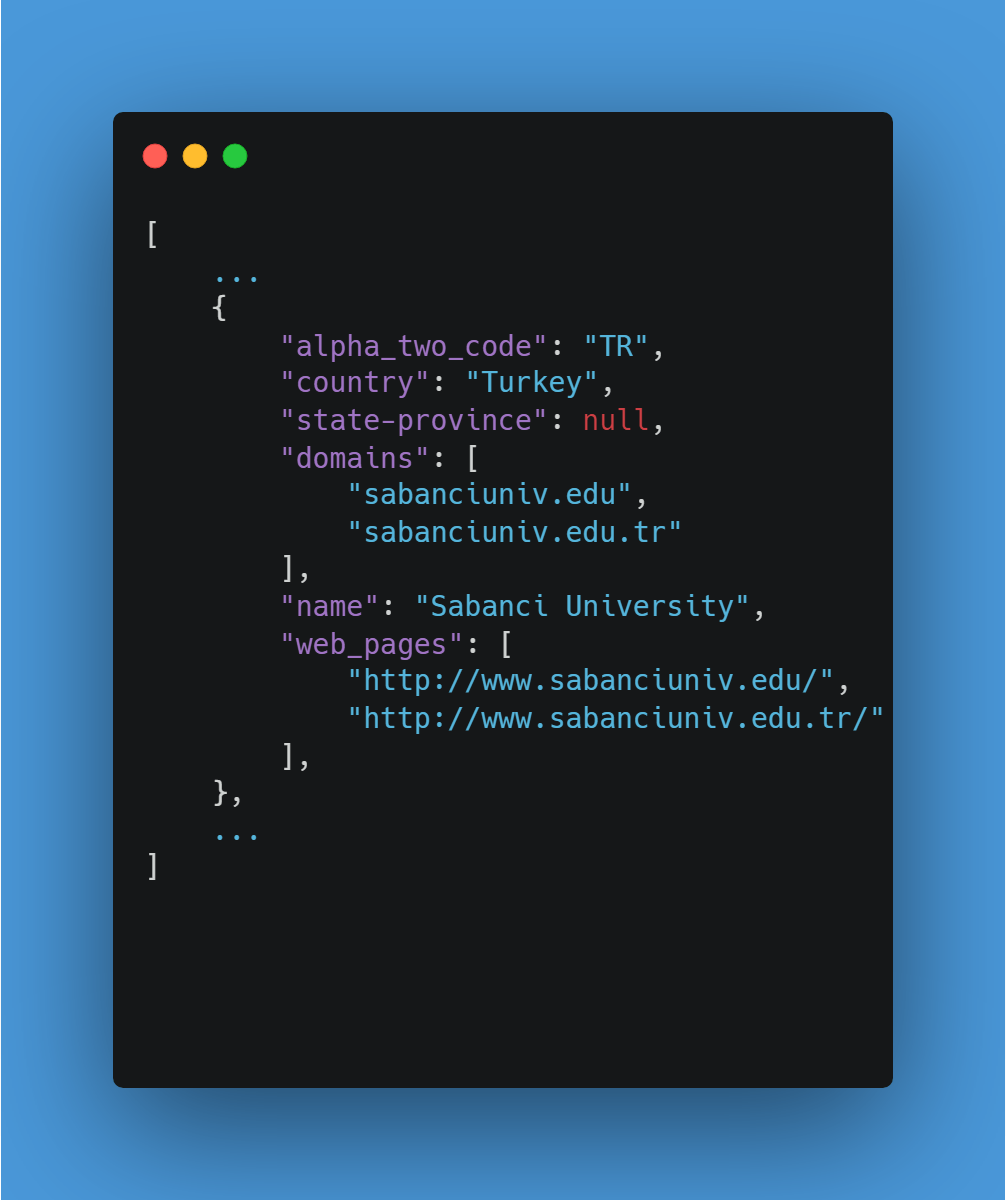
We are going to populate the database with data from Hipo.
Sample data:
Project Setup
mkdir universities
cd universities
Virtual environment and packages
Create and activate the virtual environment:
python -m venv env
source env/bin/activate
Install the project's requirements:
pip install django==3.2 graphene_django requests
Set up the project and application:
django-admin startproject config .
python manage.py startapp api
Next register the api app and graphene-django in our project's config. Find the INSTALLED_APPS list In config/settings.py then add api and graphene-django to it:
INSTALLED_APPS = [
    ...
    # third party apps
    "graphene_django",
    # local apps
    "api",
]
Database
we will make use of PostgreSQL in this application. Here is a guide to get you started. When you're done with that sync your database for the first time:
python manage.py migrate
Here is a general overview of what we are going to build
Now we're ready.
Models
Start by defining the database models:
from django.db import models
from django.contrib.postgres.fields import ArrayField


class University(models.Model):
    name = models.CharField(max_length=255, unique=True, primary_key=True)
    country = models.CharField(max_length=56)
    alpha_two_code = models.CharField(max_length=2)
    web_pages = ArrayField(models.TextField())
    domains = ArrayField(models.TextField(unique=True))
    state_province = models.TextField(null=True)

    def __str__(self):
        return self.name

    class Meta:
        verbose_name_plural = "Universities"
Create and run migrations to update your database's schema:
python manage.py makemigrations api
python manage.py migrate
Schema
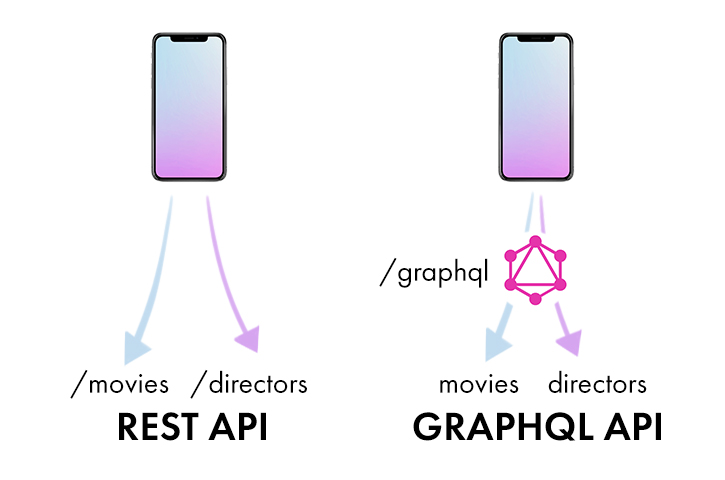
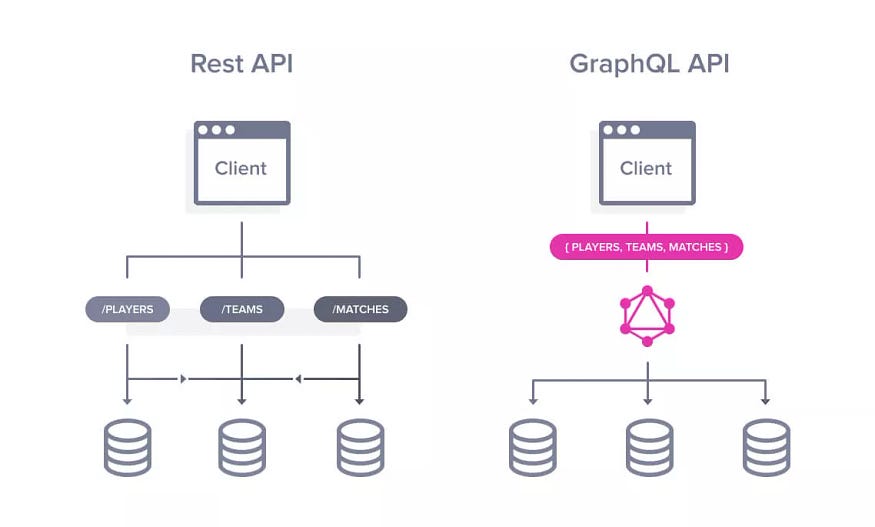
GraphQL presents your objects to the world as a graph structure rather than a more hierarchical structure to which you may be accustomed. This difference can be seen in the images below.
To create this representation, Graphene needs to know about each type of object which will appear in the graph.
To create GraphQL types for the University model, we are going to subclass the DjangoObjectType class which will automatically define GraphQL fields that correspond to the fields specified. Create a new file api/schema.py with the following code:
import graphene
from graphene_django import DjangoObjectType
from graphql import GraphQLError
from .models import University


class UniversityType(DjangoObjectType):
    class Meta:
        model = University
        fields = (
            "name",
            "country",
            "alpha_two_code",
            "domains",
            "web_pages",
            "state_province",
        )


class Query(graphene.ObjectType):
    all_universities = graphene.List(
        UniversityType,
        name=graphene.String(),
        country=graphene.String(),
        alpha_two_code=graphene.String(),
        domain=graphene.String(),
    )

    def resolve_all_universities(parent, info, **search):
        try:
            name = search.get("name")
            country = search.get("country")
            alpha_two_code = search.get("alpha_two_code")
            domain = search.get("domain")
            if country and name:
                return University.objects.filter(name__icontains=name).filter(
                    country__icontains=country
                )
            elif alpha_two_code and name:
                return University.objects.filter(name__icontains=name).filter(
                    alpha_two_code__iexact=alpha_two_code
                )
            elif country:
                return University.objects.filter(country__icontains=country)
            elif name:
                return University.objects.filter(name__icontains=name)
            elif alpha_two_code:
                return University.objects.filter(
                    alpha_two_code__icontains=alpha_two_code
                )
            elif domain:
                return University.objects.filter(domains__icontains=domain)

        except Exception:
            raise GraphQLError("You did not provide any arguments.")


schema = graphene.Schema(query=Query)
The Query class defines the GraphQL queries that the API will provide to clients. The method defined in the class is called a resolver; it receives any arguments declared in the field definition. Every query in the schema is mapped to a resolver method using the following pattern:
def resolve_foo(parent, info, **kwargs):
The all_universities query will return a list of all the UniversityType instances that match the provided search parameters.
GraphQL and GraphiQL views
Unlike a RESTful API, GraphQL is typically served over HTTP via a single endpoint. Requests to this endpoint are handled by Graphene’s GraphQLView view. In your Root_URLconf - the config/urls.py file add the following code:
from django.contrib import admin
from django.urls import path
from django.views.decorators.csrf import csrf_exempt
from graphene_django.views import GraphQLView

from api.schema import schema

urlpatterns = [
    path("admin/", admin.site.urls),
    path("graphql/", csrf_exempt(GraphQLView.as_view(graphiql=True, schema=schema))),
]
We set the graphiql argument as True to enable GraphiQL. GraphiQL is a web-based integrated development environment to assist in the writing and executing of GraphQL queries. And also specify the target schema.
Data Fetching
In this section, we are going to create a custom management command to fetch the data and update our database. To do this, add a management/commands directory to the application, then create update.py and __init__.py modules in this directory.
In the update.py file add the following code:
from django.core.management.base import BaseCommand
import requests
from api.models import University


def fetch():
    r = requests.get(
        "https://raw.githubusercontent.com/Hipo/university-domains-list/master/world_universities_and_domains.json"
    )
    r.raise_for_status()
    return r.json()


def update_database():
    data = fetch()
    objects = []
    for x in data:
        objects.append(
            University(
                country=x["country"],
                name=x["name"],
                web_pages=x["web_pages"],
                alpha_two_code=x["alpha_two_code"],
                state_province=x["state-province"],
                domains=x["domains"],
            )
        )

    University.objects.bulk_create(objects, ignore_conflicts=True)

class Command(BaseCommand):
    help = "updates the database"

    def handle(self, *args, **options):
        update_database()
        self.stdout.write(self.style.SUCCESS("Successfully updated database"))
We started by creating fetch and update_database utility functions, and used them in the class Command which extends BaseCommand.
You can now update the database with the following command:
python manage.py update
Automating Future Updates
In this section, we are going to look at how to update our data periodically using the command defined in the previous section. This can be achieved with cron jobs on Unix systems, the Task Scheduler on Windows, and by implementing this functionality in your code using task queues with celery. This is useful in case the data changes at any point in the future.
This example is going to use Task Scheduler on Windows, refer to this guide for a detailed overview of how Task Scheduler works. First, create a batch file scheduled_task.bat in the project's root directory to run our management command in the task scheduler. It should contain the following code:
C:\__full_path_to_virtualenv__\Scripts\python.exe manage.py update
Follow these steps to set it up:
Open the task scheduler
Right-click the "Task Scheduler Library" branch, and select the New Folder option.
Right-click your new folder and select the "Create Basic Task" option.
Configure the details to fit your needs.
Select the "Start a program" option to launch the batch file we created earlier.
Testing it out
Now that it's done let's test out our API. Start up the server:
python manage.py runserver
Then go to localhost:8000/graphql and input the following query
query germanUniversities{
  allUniversities(country:"germany"){
    name
    domains
    stateProvince
  }
}
Here is a sample of the response you'll get:
{
  "data": {
    "allUniversities": [
      {
        "name": "AKAD Hochschulen für Berufstätige, Fachhochschule Leipzig",
        "domains": [
          "akad.de"
        ],
        "stateProvince": null
      },
      {
        "name": "Hochschule für Berufstätige Rendsburg",
        "domains": [
          "akad.de"
        ],
        "stateProvince": null
      },
      {
        "name": "Alice-Salomon-Fachhochschule für Sozialarbeit und Sozialpädagogik Berlin",
        "domains": [
          "asfh-berlin.de"
        ],
        "stateProvince": null
      },
...
]
Conclusion
All code examples can be found here. Thanks for stopping by.
FIN